Showing posts with label vegan. Show all posts

May 10, 2011

Curry Butternut Soup

          It's a crisp day here in MA and I'm preparing to graduate while also prepping for a busy summer job. I thought I'd take time to update you all with some recipes I have been doing to lately. Specifically this soup, and a salsa I'll post later, have been my weekly staples. Oh, and I finally got an immersion blender! This is exciting because I will no longer have to laboriously use a regular blender to puree this soup.


          This soup is great, it's simple to make, cheap and packed with fiber. I learned how to make it over Christmas Break from my pseudo-parents the Thompsons. I've especially enjoyed it because I have been trying to cut back on my meat consumption and add more vegetables into my diet. The soup is fairly spicy and will definitely warm you up in this cold weather.


                       Ingredients:                 Equipment Needed: 
                         -1 Butternut Squash               -Knife + Cutting Board
                         -1 Apple                               -Large Pot
                         -1 Onion                              -Immersion or Regular Blender
                         -3-4 Tb Curry Powder           -Stirring Spoon
                         -Canola or Coconut Oil         -Potato Peeler                    
                         -5-7 Cups Water                  
                         -3/4-1 Cup Coconut Milk
                         -Pinch of Sugar
                         -Salt to Taste
                         -A dash of Cayenne Pepper (optional)


Preparation/Cook Time: 45 Minutes
Serves: 6-8
Difficulty Rank: Takes Some Work


          Basically all the soup composes of is the squash and apple and an onion. I don't think it matters what kind of apple or onion you use, I used a yellow onion and a Fuji apple. I'm also using a coarse sea salt and I use around 1-2 Tb depending on how much soup there is; if your'e using a finer salt, I'd salt more cautiously since the finer grain will pack a stronger punch—remember, always salt to taste, do not just put in salt without regard to the volume of the soup—. For the oil you can use canola or olive, I use coconut oil; For rounding out the soup, I use coconut milk, which adds a delicate and creamy dimension to the flavor; regular cream will work too, although the flavor is less interesting. If you have an immersion blender, that's great! If you only have a regular blender or food processor then you will have to puree the soup with these. Picking the curry powder is important, I recommend just getting McCormick "Curry Powder" not "Madras Curry" or another variation; this is because Madras has cumin in it which adds a bitter undertone to the soup. The only other tip I have in regard to the curry is to add 2 Tb at the beginning and put in the last 1-2 Tb after the soup is done*; this prevents the soup from being too spicy, while still giving a full curry flavor. Just remember, add the curry, salt and coconut milk to taste, since squash come in all different sizes and you may need more or less of those than I recommended.


*When you heat spices they release more flavor and in the case of curry, make the dish hotter, hence the adding it in 2 separate batches.


In-a-nutshell Directions:
1. Cut the produce into small chunks.
2. Heat the pot with oil and 2 TB of Curry.
3. Adding Apples & Onions.       4. Add Squash & Water
3. Add apples and onions in, cook till soft.
4. Add squash and water in.
5. When soft puree with immersion blender or blend incrementally in regular blender.
6. Turn off heat and add coconut milk.
7. Add 2 TB more of Curry.
8. Salt to taste (approx: 2 TB).


Detailed Directions:
1. Cut the produce into small chunks. They can be pretty indistinct as long as they are small enough to stir around and cook quickly.

2. Heat the pot with enough oil to coat the apple and onion chunks. Add in just 2 TB of curry powder and stir in with the oil and let the spice heat for a minute.
5. Bracing the Blender

3. After the spice starts to heat up and be aromatic, add the apples and onions in; cook these for 10 minutes or until they are soft.

4. Add the squash chunks and water in; you want to add enough water to slightly submerge all the squash, but don't add to much water or else you will have to wait forever for the soup to boil down to the right consistency.

Burning Soup Splatters
5. When the squash has softened, puree the soup with an immersion blender. If you don't have one, you can use a regular blender, this takes significantly more time because you have to incrementally blend it in small batches. If you end up using a regular blender, make sure to NOT fill the blender more than halfway; if you do, all the hot steam will cause the top to explode offseriously, burning hot soup ended up all over the counter and me, not the best experience as you can see. To prevent this, get a towel and brace the lid firmly down with your hand.

6. After the soup is blended,  simmer it for a few more minutes and then turn off heat and add the coconut milk.

7. The add 2 TB more of curry powder and a dash of cayenne if you want.

8. Finally, salt to taste; I use about 2 TB but make sure to salt slowly since over-salted soup is gross. Adjust the coconut milk and curry if you want more of either. To finish I garnished with some pumpkin seeds.


Feb 24, 2011

Mix n' Match Guacamole

          Guacamole is one of those things that is super easy to make and yet, somehow, people often go for pre-made guacamole with all its additives; a lot of guacamole on the market has soy product and other totally inauthentic ingredients in it. Once you learn how to make it fresh, you won't want to ever go back to anything else. Also, making it yourself presents an opportunity for you to personalize it to your own palate. Below I listed different ingredients that go well in guacamole, I don't think you should use all of them at once, that would be inadvisable, but try to pick a few from each category and see what you like.


        Core Ingredients:    Spice Choices:    Vegetable Choices:
           -Avocados                    -Garlic                    -Tomatoes
           -Limes              +         -Cumin         +        -Red Pepper
           -Cilantro                      -Chipotle                 -Onion
           -Sea Salt                      -Cayenne                -Jalepeno
                                             -Black Pepper

        Equipment Needed:
           -Knife + Cutting Board
           -Mixing Bowl
           -Whisk or Potato Masher

Preparation/Cook Time: 5-10 Minutes
Proportion: 1 Avocado to 1/2 Lime = 1 Small Bowl
Difficulty Rank: Easy Peasy


          When choosing avocados at the store, you need to pick carefully; if you want to make guacamole today, then buy avocados that are a little bit soft. If you buy avocados that are hard, then you will have to give them 3 days or so to ripen (don't refrigerate in this case). When picking limes, also squeeze them, the ones that are softer have more juice. As for the vegetables I used a white onion because they are good raw, but you could quickly stir-fry the onions for more flavor. Red pepper tends to freshen the guacamole and tomatoes primary add texture; if you want to spice it up you can add some jalapeno or choose any mix of the spices I listed above. There are many variations you can make so just have fun and match up different ingredients.

In-a-nutshell Directions:
1. Cut up avocado.
2. Squeeze lime juice in bowl, add avocado and mash together.
3. Chop up cilantro and any other veggies desired and mix in.
4. Add any spicing desired and mix in.
5. Taste test and adjust if needed.

Detailed Directions:
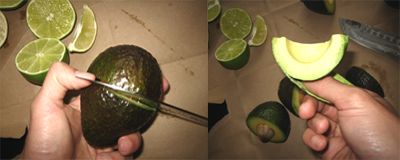
1. Cut up the avocado. The best way to go about this is to cut the knife around the middle like in the photo. Then you can cut the halves into quarters. Doing this allows you to peel the skin off easily, rather than trying to scoop the avocado out with a spoon.


2. Put the avocado wedges into the mixing bowl and squeeze 1/2 lime for every avocado you used. Now mix it together with the potato masher or use a whisk to mash the avocado. Don't over mash it since you want it to have chunks rather than be a paste.

3. Chop up the cilantro and any other vegetables that you want to have in the guacamole and mix together.

4. Add salt and any spices that you want to flavor the guacamole with and mix together.

5. Taste test the mix to see if you like it, if not adjust the flavors. It is always better to add less lime juice and salt because you can always add more if there isn't enough. Then you are done!


Jan 26, 2011

Mint Tea

          Mint tea is a great drink to have chilled on a hot summer day; I say chilled because I generally don't believe in iced drinks since it dilutes the flavor; I only put ice in the photo for aesthetic reasons, not because the drink needed it. I usually make a large batch in advance so that throughout the week, I have fresh tea to sip on. If you're looking to make this as an accompaniment to a meal, I think this would go great with a spicy summer barbecue. It's extremely refreshing and a nice change from typical iced teas, although, if you don't like mint flavor to start with, I wouldn't suggest you make this. The drink also is good steaming hot when you have a cold.


                   Ingredients:                                Equipment Needed: 
                   -14 Mint Tea Bags                          -Pot or Water Boiler
                   -10 Cups Water                             -Large Bowl
                   -Sugar (optional)*                           -Spoon
                   -Fresh Mint (optional garnish)          -Pitcher
                   -Lemon Zest (optional garnish)         -Zester (optional)

*1/2 cup of sugar will be mildly sweet and a heaping 3/4 cup will be about the same sweetness as store-bought teas.

Preparation/Cook Time: 25 Minutes
Serves: 5 Full Glasses
Difficulty Rank: Easy Peasy

          When you go to buy the tea there are several things to decide. One is what kind of mint you want. My personal preference is for peppermint tea, which has a smooth and soothing flavor and is caffeine free; there also is Moroccan Mint Tea which isn't as minty as peppermint because it is mixed with green tea, which also means it's lightly caffeinated. As far as brand goes I prefer Stash or Tazo because I personally think they have the highest quality teas, whereas other brands have a weaker brew; side-note, I've also checked some of Twining's teas and found that they added artificial flavors in, which as you can figure from my blog title, I despise. 

          If after you make the tea you find it too strong for your liking, you can dilute it with some water; I think in this situation it is easier to dilute a strong tea than to make a weak tea stronger. Also, the amount of sugar I add in makes it somewhat sweet, so if you prefer unsweetened tea, leave it out or measure to your preference. Last, if you don't plan to let the tea chill in the fridge and you plan to serve it right away with ice, you will either need to add more teabags to the brew to compensate for the ice diluting the flavor, or you will need to use less hot water to brew the tea in. I'd either add 6 teabags or take out 3 cups of water. As you can see, having to account for ice makes it more complicated, so you really should just try to make this ahead of time and refrigerate the tea.

In-a-nutshell Recipe:
1. Boil water.
2. Put boiling water in mixing bowl and drop teabags in.
3. Let steep for 10 minutes.
4. Strain teabags out.
5. Mix in sugar and let cool.
6. Place in pitcher and chill or serve with ice.
7. Garnish with mint and lemon zest before serving.

Detailed Directions:

1. Boil 10 cups of water in either a pot or one of those speedy water boilers.

 
2. Pour the boiling water into the mixing bowl and drop all the teabags in, try to make sure they don't just float on top but really steep in the water.

  
3. Leave the teabags in their to steep for 10-15 minutes.

4. Strain out teabags; make sure to press the water out of them.

5. Mix in the sugar while the tea is still warm so that it will melt easily; if you generally dislike sweet drinks, you can skip this step or add sugar to your own preference. After this step let the tea cool for a bit.


6. At this point either serve the tea with ice, or pour it into a pitcher and chill overnight. Being in college I don't have a pitcher on hand, so I used this cool tupperware.

7. Before serving, for extra flourish, you can add a sprig of fresh mint and some lemon zest as garnish.

Jan 20, 2011

Hummus

          Hummus is a great dish to make when you want to have a tasty dip for chips. Its wonderful for so many reasons; its healthy and packed with protein (take note bodybuilders), it's tasty, and a unique thing to serve to guests. Last it is super cheap and easy to make. So seriously, why buy hummus when you can make it cheaper and tastier for almost no work? Aside from a chip dip, you can also use it as a spread on crackers, bread or in sandwiches. Also, this recipe can be changed constantly to give new variations each time; chives, basil and oregano all could replace cilantro in the recipe to give it a new twist, so have fun with it and be creative, It also keeps for a long time, so you can make a large batch to use for a week.


                      Ingredients:                       Equipment Needed: 
                     -2 Cans Chickpeas                -Knife + Cutting Board
                     -2 Tb Tahini                        -Blender or Food Processor
                     -3 Tb Olive Oil                     -Mixing Bowl
                     -1 Lemon                              
                     -1 tsp Salt (or to taste)
                     -1 tsp Cayenne Pepper
                     -1 tsp each of Cumin & Coriander or (2 tsp Curry Powder)
                     -Black Pepper
                     -1/3 Red Pepper
                     -1/4 Onion
                     -Small Handful of Cilantro
                
Preparation/Cook Time: 10 Minutes
Serves: 2 Bowls of Hummus
Difficulty Rank: Easy Peasy

          The recipe is pretty straight forward and easily adapted. Tahini can usually be found in the health section of a supermarket or in the International food section under the Arabian foods; Tahini is strong, so be careful not to add to much or else the flavor will overwhelm the hummus. Also be careful salting, it is always easier to add salt over taking it out. If you want, you can use a lime instead of a lemon; also, you probably could substitute basil, chives, oregano or other fresh herbs in place of cilantro. I spice it to add some extra flavor to the hummus but if you want a lighter flavor leave them out. Last I add bell peppers for their crisp sweetness and onions for their flavor and crunch; the reason to use white onions is because they can be eaten raw, if you use another kind of onion I'd quickly pan fry them before adding them to the hummus.

In-a-nutshell Directions:
1. Put chickpeas in blender.
2. Squeeze in Lemon Juice.
3. Add in Oil and Tahini.
4. Add salt, pepper and spices.
5. Blend.
6. Chop red pepper, onion and cilantro.
7. Mix Veggies into Hummus.
8. Garnish.

Detailed Directions:

1. Put both cans of chickpeas in blender, strain out the water from one, but for the other, put the entire can including the water in the blender.

2. Squeeze a whole lemon into the blender.

3. Add in the olive oil and the tahini.

4. Add in the cayenne, black pepper, salt and other spices.

5. Blend the mixture until it is smooth and taste test it, adjust if needed.

6. Dice the red bell peppers and onions into small pieces that can be easily picked up with chips and chop cilantro. A good technique for cutting bell peppers is to cut the top off first and then dice the rest. Doing this allows for cleaner cuts and makes it easy to pull out the pepper seeds.

7. Pour the hummus into a mixing bowl and mix in the vegetables.

8. Place the hummus into a serving bowl and garnish with cilantro and any other creative things you can think of. I tossed on a few black sesame seeds.

Dec 15, 2010

Roasted Portobella Mushrooms

          Growing up I used to hate mushrooms with a passion. I mean honestly, it's a fungus! Isn't that the sort of thing that you go to the doctor for? What I eventually realized was that it was the texture that bothered me. In this recipe I'm borrowing an idea from Buddhist vegetarian restaurants in China, I'm trying to texture mushrooms to be more like meat. I bake them a bit longer than most people do so that the texture, instead of being watery and gelatinous, is more chewy and meaty.

          This mushroom recipe isn't a dish in itself, I just make a large batch so that I can keep the roasted mushrooms in a tupperware to use throughout the week. These mushrooms make a great addition to basically anything. I add them to quesadillas, sandwiches, pasta, pizza, soup, salad... now it's your turn to think of something! Because these mushrooms are roasted by themselves before being added to anything, the flavor is much more intense and meaty than it would be if you added them raw and tried to have them cook with the dish.


                        Ingredients:                            Equipment Needed: 
                        -6 Portobella Mushrooms           -Knife + Cutting Board
                        -1/2 cup Oil as needed              -Large Mixing Bowl
                        -Pepper                                   -2 Baking Sheets
                        -1/8 tsp Salt/tray                      -Spatula

Preparation/Cook Time: 1 Hour
Difficulty Rank: Easy Peasy

          When you are buying these mushrooms, there are several things to avoid to make sure you pick good ones. Don't pick broken ones that are beaten up or that have a bruised underside. Don't pick ones that are damp or are a bit slimy on the cap. If you can find ones that still have an intact bottom like the one to the right of the photo below, that would be great! I'd recommend canola oil because it can take the high oven temp without smoking and the flavor isn't strong so the mushroom really comes through.

In-a-nutshell Directions:
1. Preheat oven to 400 Fahrenheit or 200 Celsius.
2. Break off stems and rinse mushroom caps (don't wash underside).
3. Slice mushrooms to 1/2 inch thick slices.
4. Coat in oil.
5. Place on baking tray and season.
6. Bake for 25 minutes.
7. Take out and turn mushrooms over with spatula.
8. Bake for another 20-35 minutes.
9. Take them out when they are done.

Detailed Directions:

1. Preheat oven to 400 Fahrenheit or 200 Celsius.

2. Break off stems and rinse the caps, but don't wash the underside.*
          *Washing the underside will cause the mushroom to absorb water which isn't what you want.

3. Slice the mushroom caps into 1/2 inch thick slices.

4. Get a mixing bowl and put 1/2 cup of oil in it. Then drop 3-5 mushroom slices at a time in the bowl and use your hands to lightly toss them in the oil until they have a light coating on them; then put the coated mushrooms onto a baking tray. I only coat several slices at a time so that I don't break them; also, once you've lightly coated the mushrooms with oil, don't let them sit in the oil because they will keep on soaking up more oil and they will be greasy when they are done baking. You will have to add another 1/2 cup of oil as the bowl runs dry. See video demonsration below.


5. After all the mushrooms are trayed, season them with pepper and sprinkle on 1/8 tsp of salt per tray. 

6. Bake for 25 minutes.

7. Take out tray and flip mushroom slices over.*
          *This prevents burning one side.

8. Put in the oven for a remaining 20 to 35 minutes. Check periodically to gage progress. When they look like the left-side photo below, take them out.

9. Eat a piece to see if the texture is right. They should be slightly chewy and meaty, if they are too watery, bake them for a few minutes longer. Be careful not to over-bake them or they will have a dry, leathery texture and basically be mushroom chips.

Correct Texture
Overcooked Leathery Texture


-I hope you like these!

Enjoy! Johnny L