Frustration; that's how I feel about this. The fact is that it is true. I was on the phone with my best-friend yesterday, and he admitted that while he thinks everything I cook is great (that's really nice of him), when I tell him for instance, that the Curry Butternut Soup is dairy and gluten free plus really fiber-packed, this bothers him. Unbeknownst to me, in America "healthful food" is usually a turn off. I probably should have realized this considering most appetizers on a menu are deep-fried; it just never occurred to me since almost all food in Asia is dairy and gluten-free (probably why everyone is thin over here).
Anyway, the restaurant industry has particularly exploited this psychological technique. Watch out, a mac and cheese will have "toasted bread crumbs" when what they really mean is "stale ritz crackers". Or the "summer veggie lasagna" really means they made it a week ago and its been sitting in the back of the fridge. The essence of this idea is that by describing a dish positively, the customer preps their brain to seek out and taste the things described; hence why my friend found the health precedents a turn off.
If you can't already tell, this idea drives me crazy; it means screw objectivity, all that matters is you make people perceive the food how you want them to. Being me, rather than try pulling an Inception, I stopped telling people what kind of food they were tasting, just to see what they would think. One person thought there were avocados in a mint chutney and another thought green tea with creamer was coffee. Then, I negatively precedented a peanut sauce I made (that was obviously fine) to see what feedback I'd get. Immediately the person put on a big show of "objectively" finding the problem with it and concluded that I used too much ginger (which I didn't use at all).
So, this just goes to show you, you don't need an airplane and sci-fi dream machines to change people's reality.
That's all, and I'm offering no offense, which means you can't take any : )
-John
May 29, 2011
May 10, 2011
Curry Butternut Soup
It's a crisp day here in MA and I'm preparing to graduate while also prepping for a busy summer job. I thought I'd take time to update you all with some recipes I have been doing to lately. Specifically this soup, and a salsa I'll post later, have been my weekly staples. Oh, and I finally got an immersion blender! This is exciting because I will no longer have to laboriously use a regular blender to puree this soup.
This soup is great, it's simple to make, cheap and packed with fiber. I learned how to make it over Christmas Break from my pseudo-parents the Thompsons. I've especially enjoyed it because I have been trying to cut back on my meat consumption and add more vegetables into my diet. The soup is fairly spicy and will definitely warm you up in this cold weather.
Ingredients: Equipment Needed:
-1 Butternut Squash -Knife + Cutting Board
-1 Apple -Large Pot
-1 Onion -Immersion or Regular Blender
-3-4 Tb Curry Powder -Stirring Spoon
-Canola or Coconut Oil -Potato Peeler
-5-7 Cups Water
-3/4-1 Cup Coconut Milk
-Pinch of Sugar
-Salt to Taste
-A dash of Cayenne Pepper (optional)
Preparation/Cook Time: 45 Minutes
Serves: 6-8
Difficulty Rank: Takes Some Work
Basically all the soup composes of is the squash and apple and an onion. I don't think it matters what kind of apple or onion you use, I used a yellow onion and a Fuji apple. I'm also using a coarse sea salt and I use around 1-2 Tb depending on how much soup there is; if your'e using a finer salt, I'd salt more cautiously since the finer grain will pack a stronger punch—remember, always salt to taste, do not just put in salt without regard to the volume of the soup—. For the oil you can use canola or olive, I use coconut oil; For rounding out the soup, I use coconut milk, which adds a delicate and creamy dimension to the flavor; regular cream will work too, although the flavor is less interesting. If you have an immersion blender, that's great! If you only have a regular blender or food processor then you will have to puree the soup with these. Picking the curry powder is important, I recommend just getting McCormick "Curry Powder" not "Madras Curry" or another variation; this is because Madras has cumin in it which adds a bitter undertone to the soup. The only other tip I have in regard to the curry is to add 2 Tb at the beginning and put in the last 1-2 Tb after the soup is done*; this prevents the soup from being too spicy, while still giving a full curry flavor. Just remember, add the curry, salt and coconut milk to taste, since squash come in all different sizes and you may need more or less of those than I recommended.
*When you heat spices they release more flavor and in the case of curry, make the dish hotter, hence the adding it in 2 separate batches.
Detailed Directions:
5. When the squash has softened, puree the soup with an immersion blender. If you don't have one, you can use a regular blender, this takes significantly more time because you have to incrementally blend it in small batches. If you end up using a regular blender, make sure to NOT fill the blender more than halfway; if you do, all the hot steam will cause the top to explode off—seriously, burning hot soup ended up all over the counter and me, not the best experience as you can see—. To prevent this, get a towel and brace the lid firmly down with your hand.
This soup is great, it's simple to make, cheap and packed with fiber. I learned how to make it over Christmas Break from my pseudo-parents the Thompsons. I've especially enjoyed it because I have been trying to cut back on my meat consumption and add more vegetables into my diet. The soup is fairly spicy and will definitely warm you up in this cold weather.
-1 Butternut Squash -Knife + Cutting Board
-1 Apple -Large Pot
-1 Onion -Immersion or Regular Blender
-3-4 Tb Curry Powder -Stirring Spoon
-Canola or Coconut Oil -Potato Peeler
-5-7 Cups Water
-3/4-1 Cup Coconut Milk
-Pinch of Sugar
-Salt to Taste
-A dash of Cayenne Pepper (optional)
Preparation/Cook Time: 45 Minutes
Serves: 6-8
Difficulty Rank: Takes Some Work
Basically all the soup composes of is the squash and apple and an onion. I don't think it matters what kind of apple or onion you use, I used a yellow onion and a Fuji apple. I'm also using a coarse sea salt and I use around 1-2 Tb depending on how much soup there is; if your'e using a finer salt, I'd salt more cautiously since the finer grain will pack a stronger punch—remember, always salt to taste, do not just put in salt without regard to the volume of the soup—. For the oil you can use canola or olive, I use coconut oil; For rounding out the soup, I use coconut milk, which adds a delicate and creamy dimension to the flavor; regular cream will work too, although the flavor is less interesting. If you have an immersion blender, that's great! If you only have a regular blender or food processor then you will have to puree the soup with these. Picking the curry powder is important, I recommend just getting McCormick "Curry Powder" not "Madras Curry" or another variation; this is because Madras has cumin in it which adds a bitter undertone to the soup. The only other tip I have in regard to the curry is to add 2 Tb at the beginning and put in the last 1-2 Tb after the soup is done*; this prevents the soup from being too spicy, while still giving a full curry flavor. Just remember, add the curry, salt and coconut milk to taste, since squash come in all different sizes and you may need more or less of those than I recommended.
*When you heat spices they release more flavor and in the case of curry, make the dish hotter, hence the adding it in 2 separate batches.
In-a-nutshell Directions:
1. Cut the produce into small chunks.
2. Heat the pot with oil and 2 TB of Curry.
4. Add squash and water in.
5. When soft puree with immersion blender or blend incrementally in regular blender.
6. Turn off heat and add coconut milk.
7. Add 2 TB more of Curry.
8. Salt to taste (approx: 2 TB).
Detailed Directions:
1. Cut the produce into small chunks. They can be pretty indistinct as long as they are small enough to stir around and cook quickly.
2. Heat the pot with enough oil to coat the apple and onion chunks. Add in just 2 TB of curry powder and stir in with the oil and let the spice heat for a minute.
3. After the spice starts to heat up and be aromatic, add the apples and onions in; cook these for 10 minutes or until they are soft.
4. Add the squash chunks and water in; you want to add enough water to slightly submerge all the squash, but don't add to much water or else you will have to wait forever for the soup to boil down to the right consistency.
![]() |
| Burning Soup Splatters |
6. After the soup is blended, simmer it for a few more minutes and then turn off heat and add the coconut milk.
7. The add 2 TB more of curry powder and a dash of cayenne if you want.
8. Finally, salt to taste; I use about 2 TB but make sure to salt slowly since over-salted soup is gross. Adjust the coconut milk and curry if you want more of either. To finish I garnished with some pumpkin seeds.
The Asian Gummy Post
So I went to Boston and I have to admit, the highlight of going into Boston for me is going to Chinatown. Going there gives me the espresso shot of Asian culture that I miss from not living there anymore. This post, as silly as it is, will focus on gummies—hope your excited!— Interestingly, you can tell a lot about Asian culture just from these candies.
First.... take note of the flavors.
PEACH
MANGO
MELON
Definitely not your typical Target candy. Also the flavors are a less artificial than Peach O's and they are less sugary than most of our sweets.
Culture note number two is that the gummies are individually packaged. This is definitely an Asian thing since sanitation and sharing are huge there.
I admit I'm biased, gummies are my favorite candy since I don't have the patience for things I can't chew. But if you want to eat something fun or get a unique snack for your kids, this would be the way to go.
First.... take note of the flavors.
PEACH
MANGO
MELON
Definitely not your typical Target candy. Also the flavors are a less artificial than Peach O's and they are less sugary than most of our sweets.
Culture note number two is that the gummies are individually packaged. This is definitely an Asian thing since sanitation and sharing are huge there.
I admit I'm biased, gummies are my favorite candy since I don't have the patience for things I can't chew. But if you want to eat something fun or get a unique snack for your kids, this would be the way to go.
Mar 25, 2011
Flavor Divorce
So I often personify my flavors (yeah, you can tease me if you want). Strawberry is like a girl that is always the center of attention, she is sweet but a bit sharp and dominating. Flavor personalities that go well with her, can't compete for the palate spotlight and instead act as back up flavors; think strawberries and cream, the cream is mellow and cuts the strawberries tartness.
Perfect Couples and Best-friends: Flavors that are made for each other and are often seen together; one precedes the other.
-Chocolate & Hazelnut
-Butter & Honey
-Lime & Cilantro
Odd Couples: Unconventional or unintuitive matches that go great!
-Cheese & Fruit
-Salt and a Margarita
A Friend Group: A group of flavors that goes well together but any two individual flavors in the group aren't necessarily destined to go together.
-Curry
-Apple Pie
That's all, let me know what your observations on this concept are.
Perfect Couples and Best-friends: Flavors that are made for each other and are often seen together; one precedes the other.
-Chocolate & Hazelnut
-Butter & Honey
-Lime & Cilantro
Odd Couples: Unconventional or unintuitive matches that go great!
-Cheese & Fruit
-Salt and a Margarita
A Friend Group: A group of flavors that goes well together but any two individual flavors in the group aren't necessarily destined to go together.
-Curry
-Apple Pie
Divorced Flavors:
I recently found a couple of flavors that are so awful together that they are forever divorced in my mind; Balsamic Vinegar and the Anise/Licorice flavor (fennel, anise, Thai Basil). Balsamic is like a sweet but really complicated person while, for instance, Thai Basil, is fresh but dominating and lacks the ability to appreciate the vinegar's complexity; as a couple the basil sours the balsamic and the vinegar turn the basil bitter. It's an awful, awful combo.Mar 16, 2011
Miso-Mirin Caramelized Onions
This is a quick and delicious way to prepare onions. I created this recipe while playing around with Japanese ingredients and it tastes amazing. They are fairly sweet and go great in sandwiches, on soba noodles, pizza and probably lots of other things that you can discover yourself.
Ingredients: Equipment Needed:
-Onion -Knife+Cutting Board
-Black Pepper -Pan
-Oil -Spatula
-Mirin -Mixing Bowl+Spoon
-Miso
Preparation/Cook Time: 12 Minutes
Serving Ratio: 1/4 Onion is plenty for a sandwich
Difficulty Rank: Easy Peasy
So a few things about the ingredients: first, mirin is a Japanese cooking wine that has sugar in it, this helps the caramelization process and if you use a different wine it will not caramelize or have the same depth of flavor. Miso, is basically soybean paste that has a lighter and more delicate flavor than soy sauce. There are several types of miso, so you will have to decide which one you want; I believe the darker redder misos have fish in them too while the lighter ones don't, you can check for miso at an Asian supermarket. Also use canola oil since the flavor is mild and it won't smoke at high heats. I use a mix of canola oil with a little butter to add flavor.
In-a-nutshell Directions:
1. Slice the onions quite thin.
2. Heat the pan with oil and butter (optional).
3. When the pan is at medium-high heat, drop the onions in and add black pepper.
4. Let cook on one side till slight browning of edges.
5. Stir onions and continue to let brown.
6. Mix miso and mirin together and pour mix onto onions.
7. Let simmer till liquid turns thick and syrupy.
Detailed Directions:
Ingredients: Equipment Needed:
-Onion -Knife+Cutting Board
-Black Pepper -Pan
-Oil -Spatula
-Mirin -Mixing Bowl+Spoon
-Miso
Preparation/Cook Time: 12 Minutes
Serving Ratio: 1/4 Onion is plenty for a sandwich
Difficulty Rank: Easy Peasy
So a few things about the ingredients: first, mirin is a Japanese cooking wine that has sugar in it, this helps the caramelization process and if you use a different wine it will not caramelize or have the same depth of flavor. Miso, is basically soybean paste that has a lighter and more delicate flavor than soy sauce. There are several types of miso, so you will have to decide which one you want; I believe the darker redder misos have fish in them too while the lighter ones don't, you can check for miso at an Asian supermarket. Also use canola oil since the flavor is mild and it won't smoke at high heats. I use a mix of canola oil with a little butter to add flavor.
In-a-nutshell Directions:
1. Slice the onions quite thin.
2. Heat the pan with oil and butter (optional).
3. When the pan is at medium-high heat, drop the onions in and add black pepper.
4. Let cook on one side till slight browning of edges.
5. Stir onions and continue to let brown.
6. Mix miso and mirin together and pour mix onto onions.
7. Let simmer till liquid turns thick and syrupy.
Detailed Directions:1. Begin by slicing the onions thinly*. I used a serrated knife rather than a regular knife since the serration makes thin slicing easier*.
*Slicing thinly allows them to cook quickly and brown on the edges.
*A non-serrated knife uses more pressure to cut, whereas with a serrated knife it is more about the "sawing motion".
2. Heat the pan to a medium high heat and place a thin layer of oil in the pan. I sometimes add butter to the oil for extra flavor, but do not use butter by itself because it will smoke at that high temperature. Using a high temperature is important because it allows the onions to crisp on the edges.
3. When the pan is hot, drop the onions in and add some black pepper on top. Make sure to spread the onions out, otherwise they will steam up rather than sear*.
*This is why I only cook about 1/4 an onion at a time because too many onions in the pan will prevent the slices from searing and crisping.
![]() |
| 3. Onions spread out. 6. Satisfactorily browned. |
4. Let the onions stay on one side for a few minutes, they should brown a bit on the edges but don't worry, this is part of the process.
5. After they brown a bit on one side, stir them up a bit to allow the other sides to crisp up.
6. Mix a tiny bit of miso and mirin together in a bowl. I usually have a bit more mirin than miso in the mix. When the onions look satisfactorily browned, pour the mixture in the pan.
![]() |
| 6. Miso-Mirin Mixture. 7. Caramelization. |
7. The mixture will bubble briefly and then turn thicker and more syrupy, at this point the onions are done and will have a nice shiny gloss from the miso-mirin mixture.
Feb 24, 2011
Mix n' Match Guacamole
Guacamole is one of those things that is super easy to make and yet, somehow, people often go for pre-made guacamole with all its additives; a lot of guacamole on the market has soy product and other totally inauthentic ingredients in it. Once you learn how to make it fresh, you won't want to ever go back to anything else. Also, making it yourself presents an opportunity for you to personalize it to your own palate. Below I listed different ingredients that go well in guacamole, I don't think you should use all of them at once, that would be inadvisable, but try to pick a few from each category and see what you like.
Core Ingredients: Spice Choices: Vegetable Choices:
-Avocados -Garlic -Tomatoes
-Limes + -Cumin + -Red Pepper
-Cilantro -Chipotle -Onion
-Sea Salt -Cayenne -Jalepeno
-Black Pepper
Equipment Needed:
-Knife + Cutting Board
-Mixing Bowl
-Whisk or Potato Masher
Preparation/Cook Time: 5-10 Minutes
Proportion: 1 Avocado to 1/2 Lime = 1 Small Bowl
Difficulty Rank: Easy Peasy
When choosing avocados at the store, you need to pick carefully; if you want to make guacamole today, then buy avocados that are a little bit soft. If you buy avocados that are hard, then you will have to give them 3 days or so to ripen (don't refrigerate in this case). When picking limes, also squeeze them, the ones that are softer have more juice. As for the vegetables I used a white onion because they are good raw, but you could quickly stir-fry the onions for more flavor. Red pepper tends to freshen the guacamole and tomatoes primary add texture; if you want to spice it up you can add some jalapeno or choose any mix of the spices I listed above. There are many variations you can make so just have fun and match up different ingredients.
In-a-nutshell Directions:
1. Cut up avocado.
2. Squeeze lime juice in bowl, add avocado and mash together.
3. Chop up cilantro and any other veggies desired and mix in.
4. Add any spicing desired and mix in.
5. Taste test and adjust if needed.
Detailed Directions:
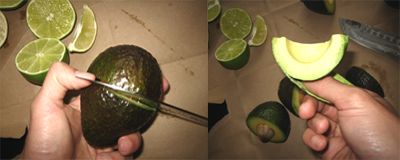
1. Cut up the avocado. The best way to go about this is to cut the knife around the middle like in the photo. Then you can cut the halves into quarters. Doing this allows you to peel the skin off easily, rather than trying to scoop the avocado out with a spoon.
2. Put the avocado wedges into the mixing bowl and squeeze 1/2 lime for every avocado you used. Now mix it together with the potato masher or use a whisk to mash the avocado. Don't over mash it since you want it to have chunks rather than be a paste.
3. Chop up the cilantro and any other vegetables that you want to have in the guacamole and mix together.
4. Add salt and any spices that you want to flavor the guacamole with and mix together.
5. Taste test the mix to see if you like it, if not adjust the flavors. It is always better to add less lime juice and salt because you can always add more if there isn't enough. Then you are done!
Feb 23, 2011
Sichuan Eggplant (Yu Xiang Qie Zhi)
This dish is called "fish flavored eggplant" in Chinese. There is nothing fishy about it, so don't be put off by the translation; it got the name because fish is cooked with the same kinds of flavors. This dish is from the Sichuan region of China, which is in the south west part of the country; Sichuan food generally is spicy, salty and pungent, as the Chinese would put it. This is what "authentic" Chinese tastes like; it is not dripping in grease and sugar, instead it has pleasantly strong mixture of ingredients that keeps you interested with the complexity of the flavor. Also, this dish, like all Asian food, sits lightly in your stomach; after eating it you will feel pleasantly full, rather than weighed down by the meal. It took me two tries to get this dish down, the first time I messed up the technique and the flavors were weak; the second time, my mom lectured me through my "obvious" mistakes, and I did great!
Ingredients: Equipment Needed:
-8 or 9 Chinese Eggplants -Knife+Cutting Board
-1.5 inch Chunk of Ginger -Pot
-5 Garlic Cloves -Slotted Spoon (for deep frying)
-4 Scallion Sprigs -Wok or Large Pan
-Spatula
-1/2 pound Pork -3 Mixing Bowls
-Soy Sauce
-Cooking Wine
-White Vinegar
-Chili Bean Paste
-Bouillon or Salt
-Little Sugar
-Cornstarch
Preparation/Cook Time: 1 Hour
Serves: 6-8
Difficulty Rank: Takes a Little Work
While this recipe isn't complicated, it does hinge of a few key cooking techniques. It is extremely important that you follow these steps in the right order, otherwise the dish will come out poorly. The 3 most important parts are the flash frying, the proper stir-frying technique and the flavoring. Don't worry though, I'll make sure I explain it thoroughly in the recipe! The slotted spoon I talk about above, is any type of utensil that you can use to lift the eggplant chunks out of the deep-frying oil while having the oil drain through the utensil. As for flavoring the dish, I don't know the exact measurements for the soy sauce, vinegar and such, so I will try to give approximations; make sure to taste test the flavors to see if it needs more of anything. Don't be intimidated by the length of my directions, stir-frying is fairly simple, I just want to make sure you thoroughly understand each step.
Now for the ingredients, there are several things to note: one is that the eggplant is "Chinese" not Italian or American eggplant; this is important since Chinese eggplants are thinner and more tender, also, the skin is edible unlike the leathery American varieties. You can go to a Chinese supermarket to pick some up, if you can't, then buy regular eggplant that is fairly thin like the ones in the photo above. For the Chili Bean Paste, again, you will have to buy this in Chinatown or the Asian section of the supermarket; I don't know of any supplements for this sauce. As for the bouillon, powdered is easiest to use, but a better, than bouillon would work. Any cooking wine is fine, I use a Chinese one, but anything goes. Last, don't you dare think of trying to use powdered garlic and ginger! Using fresh ginger and garlic will really make a difference, I promise.
In-a-nutshell Directions:
1. Fill the pot with oil and set to high heat.
2. Cut up the eggplant.
3. Deep fry eggplant in several batches until the pieces are golden on edges.
4. Use slotted spoon to get eggplant out set aside in bowl.
5. While flash frying eggplant, mince garlic and ginger and slice scallions.
6. Cube meat and marinate with little soy sauce and wine.
7. Put wok on stove and set to high heat with oil.
8. Fry garlic and ginger in oil first.
9. Then add Chili Paste and stir.
10. Add pork and cook until the meat is mostly done.
11. Add finished eggplant in and stir.
12. Add soy sauce, cooking wine, vinegar, bouillon and pinch of sugar and stir.
13. Mix cornstarch with water, then pour mixture in wok and stir.
14. Taste-test and fix if needed.
15. Plate and garnish with scallions.
Detailed Directions:
1. Fill the pot with enough oil in it so that the eggplant will be fully submerged in the oil. Now set the pot on the stove at a medium-high heat. It is better to start with a little extra oil since the many batches of eggplant will soak it up as you cook.
2. Cut up the eggplant. Each one should cut into about 3 or 4 segments, the goal is to have the segments be about as long as you pinky finger. After segmenting the eggplant, cut the segments into either 4 or 6 parts, depending on the thickness.
3. After all the eggplant is cut up, test the oil with a piece to see if the oil is hot enough. If you hear a nice sizzle then you know the oil is hot enough. Drop small batches of eggplant into the oil, put the purple skin-side face down (this prevents the color from turning a gross brown); now fry until the edges are a little golden. This technique seals the eggplant together so that it won't fall apart in the stir fry.
4. Use the slotted spoon to fish out the eggplant when it is done and set the finished pieces aside in a bowl or plate. While each batch cooks, you can do other preparations, just make sure to check on the eggplant every few minutes.
5. While frying the batches of eggplant, mince the ginger and garlic and set aside. Then slice the scallions thinly and set aside.
6. Now cube the pork and put in a mixing bowl with a little splash of soy sauce and cooking wine. This will allow it to get a quick marinade in before you start cooking.
7. When all the batches of eggplant are finished, put a wok on the stove and turn to a medium-high heat. Put a little frying oil in the wok, just enough to coat the bottom.
8. When the oil is hot, put the garlic and ginger in. They should sizzle on contact. It is CRITICAL that you put the garlic and ginger in first, this step bring out their aroma and flavors the oil. Also, make sure that they sizzle on contact, otherwise the heat isn't high enough.
9. After the garlic and ginger have sizzled for a minute, put 3 or 4 TB of the Chili Paste in and stir the paste into it.
10. Now add the pork into the wok, keep stirring and cook until the meat is mostly done; this only should take about two minutes.
11. Now put all the eggplant pieces into the wok and mix with the meat.
12. Now add in the soy sauce, vinegar, cooking wine, a little bouillon, a dash of sugar* and stir.
*A little sugar helps tie all the flavors together, just make sure you don't add more than a TB since the dish isn't supposed to be sweet.
13. Get 1.5 or 2 TB of cornstarch* and mix with a little water. When the cornstarch is dissolved mix it into the wok.
*Cornstarch thickens the sauce, but if you put it in directly without mixing it with water it will clump up.
14. Now taste test the dish. If it isn't salty enough, add a little more bouillon or soy sauce; if it isn't sour enough for your liking, add a splash more of vinegar, if you want more spice, add another spoon of the chili paste.
15. Okay, your all done, plate the dish, garnish with the scallions* and enjoy.
*By adding the scallion at the end, you prevent them from losing their vivid green color.
Ingredients: Equipment Needed:
-8 or 9 Chinese Eggplants -Knife+Cutting Board
-1.5 inch Chunk of Ginger -Pot
-5 Garlic Cloves -Slotted Spoon (for deep frying)
-4 Scallion Sprigs -Wok or Large Pan
-Spatula
-1/2 pound Pork -3 Mixing Bowls
-Soy Sauce
-Cooking Wine
-White Vinegar
-Chili Bean Paste
-Bouillon or Salt
-Little Sugar
-Cornstarch
Preparation/Cook Time: 1 Hour
Serves: 6-8
Difficulty Rank: Takes a Little Work
While this recipe isn't complicated, it does hinge of a few key cooking techniques. It is extremely important that you follow these steps in the right order, otherwise the dish will come out poorly. The 3 most important parts are the flash frying, the proper stir-frying technique and the flavoring. Don't worry though, I'll make sure I explain it thoroughly in the recipe! The slotted spoon I talk about above, is any type of utensil that you can use to lift the eggplant chunks out of the deep-frying oil while having the oil drain through the utensil. As for flavoring the dish, I don't know the exact measurements for the soy sauce, vinegar and such, so I will try to give approximations; make sure to taste test the flavors to see if it needs more of anything. Don't be intimidated by the length of my directions, stir-frying is fairly simple, I just want to make sure you thoroughly understand each step.
Now for the ingredients, there are several things to note: one is that the eggplant is "Chinese" not Italian or American eggplant; this is important since Chinese eggplants are thinner and more tender, also, the skin is edible unlike the leathery American varieties. You can go to a Chinese supermarket to pick some up, if you can't, then buy regular eggplant that is fairly thin like the ones in the photo above. For the Chili Bean Paste, again, you will have to buy this in Chinatown or the Asian section of the supermarket; I don't know of any supplements for this sauce. As for the bouillon, powdered is easiest to use, but a better, than bouillon would work. Any cooking wine is fine, I use a Chinese one, but anything goes. Last, don't you dare think of trying to use powdered garlic and ginger! Using fresh ginger and garlic will really make a difference, I promise.
In-a-nutshell Directions:
1. Fill the pot with oil and set to high heat.
2. Cut up the eggplant.
3. Deep fry eggplant in several batches until the pieces are golden on edges.
4. Use slotted spoon to get eggplant out set aside in bowl.
5. While flash frying eggplant, mince garlic and ginger and slice scallions.
6. Cube meat and marinate with little soy sauce and wine.
7. Put wok on stove and set to high heat with oil.
8. Fry garlic and ginger in oil first.
9. Then add Chili Paste and stir.
10. Add pork and cook until the meat is mostly done.
11. Add finished eggplant in and stir.
12. Add soy sauce, cooking wine, vinegar, bouillon and pinch of sugar and stir.
13. Mix cornstarch with water, then pour mixture in wok and stir.
14. Taste-test and fix if needed.
15. Plate and garnish with scallions.
Detailed Directions:
1. Fill the pot with enough oil in it so that the eggplant will be fully submerged in the oil. Now set the pot on the stove at a medium-high heat. It is better to start with a little extra oil since the many batches of eggplant will soak it up as you cook.
2. Cut up the eggplant. Each one should cut into about 3 or 4 segments, the goal is to have the segments be about as long as you pinky finger. After segmenting the eggplant, cut the segments into either 4 or 6 parts, depending on the thickness.
3. After all the eggplant is cut up, test the oil with a piece to see if the oil is hot enough. If you hear a nice sizzle then you know the oil is hot enough. Drop small batches of eggplant into the oil, put the purple skin-side face down (this prevents the color from turning a gross brown); now fry until the edges are a little golden. This technique seals the eggplant together so that it won't fall apart in the stir fry.
4. Use the slotted spoon to fish out the eggplant when it is done and set the finished pieces aside in a bowl or plate. While each batch cooks, you can do other preparations, just make sure to check on the eggplant every few minutes.
5. While frying the batches of eggplant, mince the ginger and garlic and set aside. Then slice the scallions thinly and set aside.6. Now cube the pork and put in a mixing bowl with a little splash of soy sauce and cooking wine. This will allow it to get a quick marinade in before you start cooking.
7. When all the batches of eggplant are finished, put a wok on the stove and turn to a medium-high heat. Put a little frying oil in the wok, just enough to coat the bottom.
8. When the oil is hot, put the garlic and ginger in. They should sizzle on contact. It is CRITICAL that you put the garlic and ginger in first, this step bring out their aroma and flavors the oil. Also, make sure that they sizzle on contact, otherwise the heat isn't high enough.
![]() |
| 6. Marinate Meat 9. Add Chili Paste 10. Add Meat to Wok |
10. Now add the pork into the wok, keep stirring and cook until the meat is mostly done; this only should take about two minutes.
11. Now put all the eggplant pieces into the wok and mix with the meat.
12. Now add in the soy sauce, vinegar, cooking wine, a little bouillon, a dash of sugar* and stir.
*A little sugar helps tie all the flavors together, just make sure you don't add more than a TB since the dish isn't supposed to be sweet.
13. Get 1.5 or 2 TB of cornstarch* and mix with a little water. When the cornstarch is dissolved mix it into the wok.
*Cornstarch thickens the sauce, but if you put it in directly without mixing it with water it will clump up.
14. Now taste test the dish. If it isn't salty enough, add a little more bouillon or soy sauce; if it isn't sour enough for your liking, add a splash more of vinegar, if you want more spice, add another spoon of the chili paste.
15. Okay, your all done, plate the dish, garnish with the scallions* and enjoy.
*By adding the scallion at the end, you prevent them from losing their vivid green color.
Subscribe to:
Posts (Atom)